

Hello everyone! I’m awkwardly sat at a kids party for the next couple of hours so I thought this would be a good opportunity to catch up on here, and start rolling out some of the drafts I have saved. Today I’m going to be writing about something that every nail tech goes through at some point in their career, gel polish chipping. Let me set the scene for you…cue dramatic music….
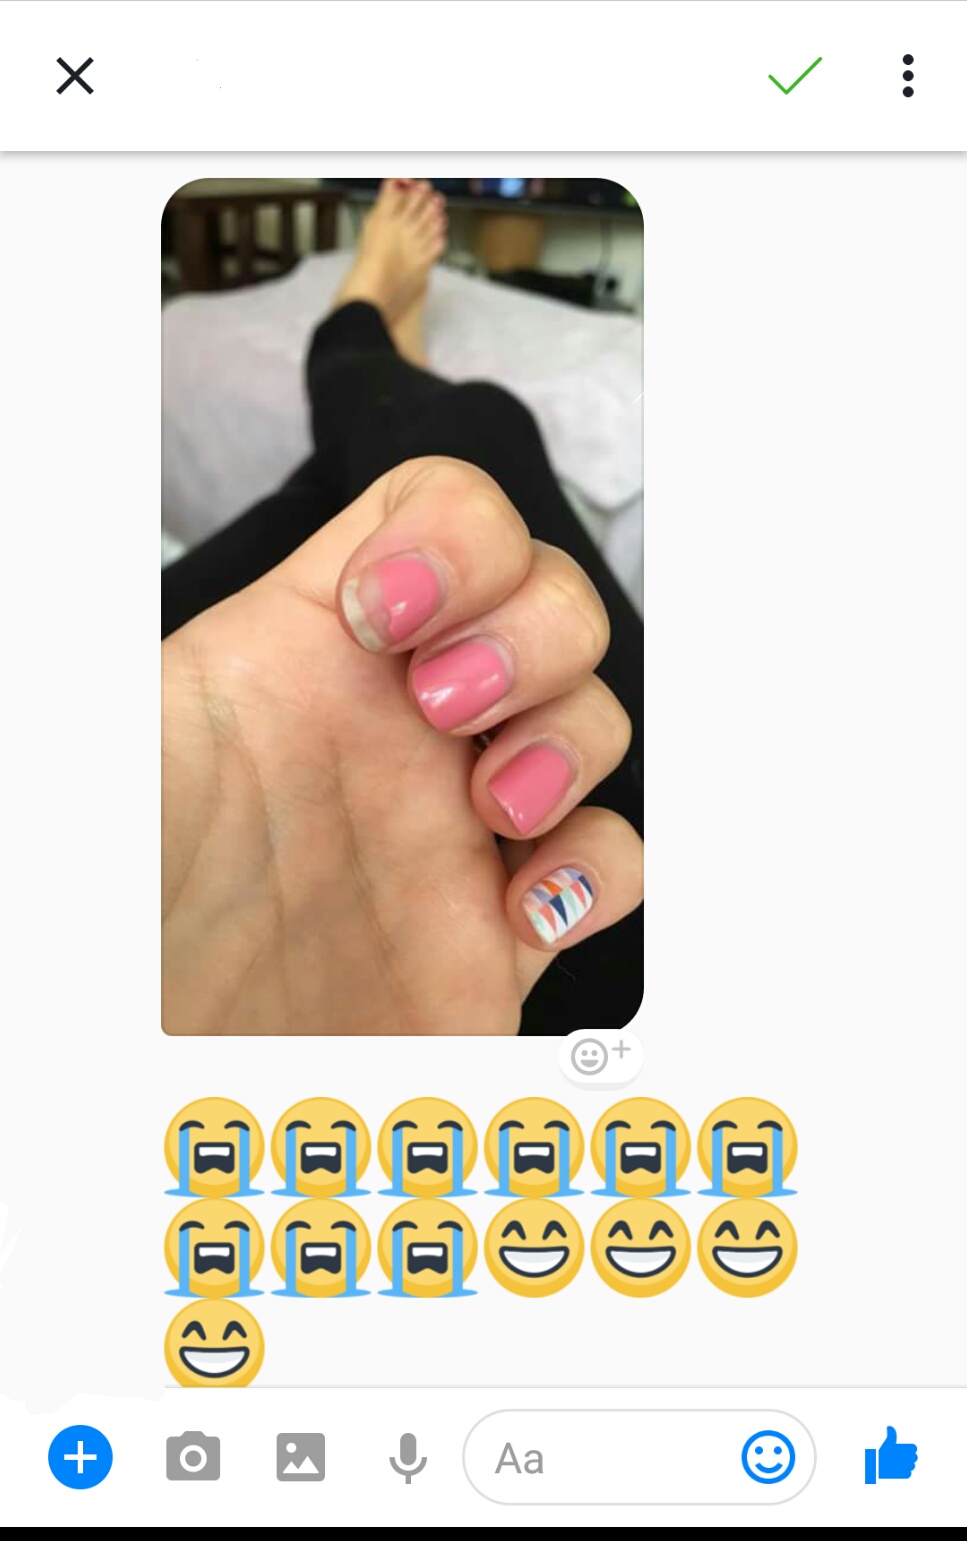
…..So you’ve just became a nail tech and you’ve done a few clients. They looked fabulous as they strolled out the door and you felt so proud. Finally, your dream has come true and you’re well on your way to becoming a success. Then, your dream turns into a nightmare when you get a picture message from your client showing you that the nails have chipped.

Your heart sinks, and you think to yourself….But whhhyyyyyyy though??!!
Then you start going over the whole process in your head. You’re sure you did everything just like you were taught. But were you taught everything? Possibly not.
I have been in this situation more times than I would like to admit. Sometimes it is just the client using their nails as tools, but if it’s within the first 48 hours, chances are, it’s down to you.
There probably are 101 reasons why it could be happening, but I haven’t come across them all yet, so here are (in my experience) the main causes of chipped gel Polish.
If you are really struggling, and need help buying products for perfect prep, check out my amazon storefront where you will find all of the products I use on a daily basis.
https://www.amazon.co.uk/shop/nailswithcourtneycrosbie
MY TOP 9 REASONS FOR CHIPPED GEL POLISH.
- Too smooth of a surface.
- Filings underneath the free edge.
- Cuticles not removed properly.
- Oils or other substances on the nail.
- Base coat applied too thickly.
- Polish applied too thickly.
- Nails are too weak and when bent, Cause tiny cracks in the Polish and cause it to chip.
- Peeling layers of natural nail underneath the gel Polish.
- Not capping the free edge on every layer.
So, let’s look at the very first, most annoying reason.
The nails are too smooth.
This is an annoying one because you want the nails to be smooth in order to get a flawless application. The littlest piece of something will only be exaggerated once you apply a few layers of Polish. But, if that nail is too smooth, naturally, the Polish will have nothing to hold on to and it will chip! Let’s think about this in a different way. If you painted a pane of glass with Gel Polish, chances are you’d be able to peel it right off. What if you painted a pane of frosted glass, you know the kind. It is sometimes in bathroom windows as a poor attempt to prevent the nosey neighbours from seeing you naked. You’d have to scrape and scratch to get it off. A lot of people are taught to buff the nail with a white buffing block to take the shine off. Unless you’re CND trained, which has been pointed out to me on several occasions. The training from other systems is right though, you do need to buff the nail. But when you start using the block more than a couple times, it gets dull. When it’s dull, it’s actually going to smooth the nail while removing the shine. If you’re trying to save some pennies and bought a cheap pack of white blocks, you’ll be lucky to get more than one use out of them. If they even last a full 10 fingers.
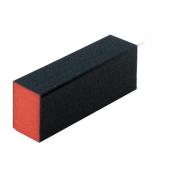
The best thing to use to remove the shine of the nail and make it a little bit rough is a 180 grit buffing block. Don’t cheap out here! I have bought buffing blocks from all different sources ranging from China cheap to luxury expensive. Sometimes you can go cheap on things, but don’t do it with buffing blocks. Just trust me on this one. I get mine from Essential Nails. They aren’t cheap. But they won’t break the bank and I can use them on a couple clients without adverse effects.
Filings underneath the free edge.

You might be wondering what the heck I am talking about here. Allow me to explain. When you file a natural nail, sometimes the section that you have filed away to get the perfect shape on your free edge doesn’t just fall onto the table beneath. Sometimes, it puts up a fight and just curls underneath the free edge. Its not attached very well, but it is still gripping on for dear life. You can see a good example of this if you file a significant amount off of a plastic tip. The same thing happens on a natural nail, just on a smaller scale. I am not going to file my nails for demonstration purposes because I am trying really hard to grow them. You are just going to have to trust me on this one. Imagine polishing a nail that has the wee bits curled underneath. You do as you were taught, and you capped that free edge like a pro. Now, the wee filings are trapped, one half stuck on to the gel polish and the other half only barely hanging on to the underside of the free edge. So guess whats going to happen? That’s right. It’s inevitably going to come away from the nail. And because the gel polish is stuck to it, the gel polish is coming away with it. The moral of this story is to clean underneath the nail with a cuticle knife or something similar to break away the wee filings before you clean the nail.
Cuticles not removed properly.

Ok boys and girls. When I talk about cuticles, I am not talking about the flap of skin that is attached to the finger. That is the proximal nail fold, which is attached to the eponychium. That being said, when you don’t remove the cuticles, not only will you have a rough looking application, but it will feel rough as well. If the client manages NOT to pick at it, the cuticle will naturally slough away anyways….as they do. It will lift the polish as a result. You can use a cuticle remover for those hard to shift cuticles, but if you are doing an enhancement service like gel polish afterwards, its not a great idea. So make sure that you are getting rid of them 100% . If this is something that you struggle with, you can watch this video I made. I show in depth, how I remove my cuticles from my nail plate, without a liquid/cream cuticle remover, and then I trim the proximal fold to ensure an exact application of gel.
Oils or other substances on the nail.
OK. You use a new buffing block every time, you have removed the wee bits from under the free edge, and your cuticles are gone. But you still aren’t getting the lasting results you want. Oils and other substances on the nail are a nightmare. You may think you’ve gotten rid of everything but it’s always worth upping your game here and going a little OTT. Once you have finished prepping your cuticles, and buffing the nail you are ready to clean it off.

I use a lint free wipe, and by lint free wipe I actually mean a paper wax strip that I have cut up into tiny squares because no lint free wipe that I have found is actually lint free. I take my wipe and spray some isopropyl alcohol on it. I get it on to that nail, and I scrub. I scrub like there’s no tomorrow and get right up onto the lower finger and into the proximal nail fold. I scrub the whole surface of the nail, and then I clean underneath of that free edge with the
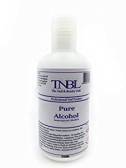
isopropyl wipe as well. There’s oils everywhere and they aren’t going to stick around on my watch and ruin my clients manicure. Once I’ve dome that, I go a step further and do the same again with the purest acetone I can find. The whole nail, under the proximal fold, and underneath the nail as well. Some people go even a step further and dehydrate the nail with a product specifically made to dehydrate, but in my experience, this is somewhere you can cheap out if you want and just use regular acetone. So, now. the nail is roughed up, and its clean as a whistle! Moving on….
Base coat applied to thickly.
As with all layers of gel polish, thin is best. Base coat brings a whole new level on thin. Think super model skinny. Already by nature, base coat is quite thin and watery compared to coloured gels or top coat. I would love to go all scientific on you here and give you an in depth reason as to why you need to do the base coat thin, but I just don’t know. If Doug Schoon ever reads this and wants to throw some input here, I’d really appreciate it.

I think it might be down to a thin layer curing differently and creating a sticker inhibition layer but don’t quote me on that. Either way, I have experimented with this. When I did a thicker layer of base coat, the base coat stuck well to my nail but the colour didn’t stick well to the base coat. Which was handy when it started chipping and I picked the rest off, because it didn’t actually damage my nails. But of course, had it not started chipping from the thick base coat, I wouldn’t have picked at it anyways. So when you are applying your base coat, remove most of the polish from the brush and do all 5 nails with one dip. Start with the thumb as there will be more polish on the brush for the first nail than the last. By the time you get to the pinky, you should have just enough left. Also!!! You want to be scrubbing that base coat into the nail that is all roughed up from the brand new buffing block you used. Get it in between all those microscopic scratches. Scrub a dub dub.
Coloured layers applied too thickly. ( The same rules apply for topcoat)

Again, Id love to tell you why this happens but I cant. I can tell you though, that any seasoned nail tech knows, that if you want lasting polish results, you need to do thin layers. You can do an experiment if you don’t believe me. Paint one of your hands with two thick layers, and paint the other with 3 thin layers. Define thin, you might say. I’m talking, that first layer of colour should be almost transparent. You might think you are already doing thin layers. But are you? Could you go any thinner? If you could go thinner, you probably should. The first layer of colour should be especially thin. The second and third layer you can apply just a bit thicker, but still it should be thin enough that if it were the only layer on a nail, it wouldn’t cover it.

Remember back in high school when we would put white glue on our hands, let it dry and peel it off? Remember how it was easier to peel off if you applied a thick layer? You could get it off in one piece. But when you wanted it to dry quickly and only applied a thin layer, you had to peel if off in pieces or worse… scrape it off with your fingernail. The same theory applies with gel polish. Don’t believe me? Get the white glue out of the craft cupboard and take a trip back in time.
Nails are too weak and when bent, cause tiny cracks in the Polish.
I have had a lot of different clients over the years. I have also painted my nails with gel polish at least 5 million times. 😉 One thing that I noticed is that when weak nails are painted in gel polish. They get harder. What a treat for us bendy nailed girls right! Well, yes but no. A gel polish overlay isn’t going to give as much strength as say, an acrylic or hard gel overlay. So the nails are still going to bend. This isn’t so much a problem for people who have naturally strong nails, but for those who’s are a bit bendy, its a problem. Especially if they are long. The clue is in the title. When the nail bends repeatedly or with enough force, its going to cause hairline fractures in the gel polish, especially the topcoat as that cures the hardest of all the layers. You might notice this particularly if you are using a top coat that is designed to be applied only over acrylics or hard gel. When there is a tiny crack in the polish, water and oils are going to get underneath. And if your client is being a good girl and applying her cuticle oil daily, they are extra doomed. Its going to compromise the adhesion and yup, you guessed it. Its going to chip.
Peeling layers of natural nail underneath the gel Polish.
Another thing I have noticed in the many years and hundreds of sets of natural nails I have inspected is this. Nails are made up of layers. Sometimes, those layers start to peel away from each other for whatever reason.

Putting a layer of gel polish over top is NOT going to stop the natural phenomenon that is a peeling layer of nail. Especially if it is anywhere near the free edge and being abused by day to day life. It may not peel off entirely and take that section of gel polish with it, but every time I have painted over a peeling nail, it has chipped. So now, when I get a client with a peeling nail I need to make a decision. If it is superficial enough, I just buff it out and polish over it. Sometimes it is too many layers and its too deep, It wont buff out easily and I would be causing too much damage to try and get rid of it. In this situation, I leave it be and let the client know that due to pre-existing damage on her nail, I can not guarantee that the polish will last as long as the other fingers. Make a note of it on the consultation card and hope for the best! Of course if you offer some kind of treatment for this like Ibx or the like, it would be the perfect time to up trade your services. Do you want fries with that?
Not capping the free edge on every layer.

Last but not least (probably most importantly) is capping the free edge. I see it so many times. People do a quick swipe across and away they go. You really need to make sure that every part of that free edge has a complete coverage of polish.

When you are painting natural nails, you HAVE to do every layer for best results. Base, every layer of colour and every layer of topcoat. Corner to corner. What I do is paint the nail, paint the free edge, and then I paint the nail again to prevent a little ridge of polish at the free edge. Inspect it really well before you put it in the light and make sure that its covered. This is important so don’t skimp out on it! When you do it right, it will wear away slowly over time but it will wear evenly and wont cause any problems!!
There are probably 93 other reasons why your gel polish is chipping. But if you follow these steps exactly, I can almost guarantee that you will see your gel polish manicures lasting longer. Don’t keep it in the back of your mind and think…. yea yea… I do all that. Pretend like you are judging someone else’s work and try to find faults in your application. Really pick yourself apart to make certain you are being 100% thorough.
So, That’s all from me today! This kids party is nearly over, *thank you baby jesus* and my phone is almost dead. Thanks for stopping by and I hope that this will help you on your journey to become the best nail tech you can be. Remember, we are all in this together! #nailtechsunite !!
If you have enjoyed this, you can follow this blog to receive emails when I upload new stuff! You don’t even need to be a Word Press member.

Just pop your email in the box and away we go on a learning adventure 🙂 You’re more than welcome to like, comment and share this post with anyone else who might need it. Just copy the link at the top, or tell them to look up “big cee little cee” on google. ( Get it? Courtney crosbie) And most of all, thanks for your continued support!!
Love
Courtney
xo

Awesome post as usual. Thanks for sharing!xx
LikeLike
Excellent advice as always. Xx
LikeLike
One of the main reasons gel polish will chip easy if it was applied to thick is the color coats don’t cure fully if applied too thick.
LikeLike
Absolutely brilliant am newly qualified and would love to receive more info
LikeLike
Hi marianne 🙂 thank you for the positive feedback! I have lots of helpful posts in the cue that are perfect for people who are just beginning their nail journey! There’s a few good ones on here already so have a look around and subscribe to my blog so you get email notifications when I write more! Xo
LikeLike
Beautiful article dear, its really informative.. And I totally love your pictures..💯💯
Check out my new post.. Its on a beautiful and gorgeous nail colour..
https://tinutrends.wordpress.com/2018/03/13/nude-is-the-classy-nail-colour-of-the-year-why/
LikeLike
Thank you so much for sharing!
LikeLike
You’re very welcome
LikeLike
Hello does is matters what type of UV light we use? Regular walmart vs professional?
LikeLike
You should always try to use the same brand lamp as your polish, but sometimes that’s not possible. I don’t know what’s for sale at Walmart but I’m sure it would be fine. I use sunUV lamps to cure all of my gels.
LikeLike